13-step color-coded filing system to keep ancestry research organized and focused.
Starting organized is more accessible than getting organized later on. It’s not uncommon for historians and genealogists to become weighed down with pedigree charts, family group records, to-do lists, research logs, documents, notes, and research tools. Before you know it, you begin to feel like you are robbing yourself of precious research time because you spend hours looking for what research and duplicating research has already been done.
Color-coded Filing System for Ancestry Research
Table of Contents
- Introduction to Color-Coded Filing System
- Getting Started with Color-Coded Filing System
- Setting up Color-Coded Filing System
- Step 1: Gather Supplies for Your Filing System
- Step 2: Put Pedigree Charts of Your Lineage at the Front of Your File Box
- Step 3: Study the Circled Five-Generation Pedigree Chart
- Step 4: Separate the Lines of Your Four Grandparents by Color
- Step 5: Put Sixteen Hanging Files into Your Box
- Step 6: Label the Colored Hanging Files with Your Family Surnames
- Step 7: Put a Highlighted Copy of Your Five-generation Pedigree Chart in Each of the Colored Folders
- Step 8: Set Up A Manila File Folder for Each Family on Your five-generation Pedigree Chart
- Step 9: File the Manila Family Folders
- Step 10: Start Filling Your Family Folders
- Step 11: Set Up Other Valuable Files
- Step 12: Expand to Other Boxes As Needed
- Step 13: How Do I keep the Basic File Folder System Updated and Valuable?
- How to Add New Surnames
- Using the Color-coded Filing System for Patronymics
Additional Resources
The following resources are provided as suggestions for how to expand your knowledge and skills:
- 13-Step Color-Coded Filing System for Ancestry Research
- 9 Easy Tips to Manage and Organize eMail for Ancestry Research
- How to Write Genealogy-Related Emails that Get Results
- 7 Step Color-coded File Organizing System for Writing Narratives
- Organizing Your Files
The system is time-tested and proven to be the organizational resource that will grow as you expand your research. The system is simple to set up, maintain, well organized, and inexpensive, and it is easy to understand for the researcher and the mildly interested relatives.
In writing this guide to the color-coded filing system for ancestry research, I made a few assumptions about who would benefit. This guide is for you if,
- You want an organizational system that is time tested and explicitly used for genealogy and family history
- You feel like you are robbing yourself of precious time because you can’t easily find elements of your research
- You don’t have a system to keep your research organized
- Your feel your current filing system is out of control
- You feel overwhelmed by the research notes and papers you have collected and continue to collect
- You want to know precisely what information you have about each ancestor
- You are concerned about organizing your research so others can pick up where you left off should something happen to you
There are thirteen steps for setting up the color-coded filing system. The system is time-tested and proven to be the organizational resource that will grow as you expand your research.
This system sets up file folders for the families on your pedigree lines and shows you how to file information about cousins and other relatives. Pedigree charts and corresponding family group folders are divided into four colors based on the lines of your four grandparents. Dividing your pedigree by color helps clarify which line a family belongs to. A family file folder holds documents and a copy of that family’s group record for each family on your pedigree. Don’t think you have to do all the steps outlined in one day. Pace yourself. Check each step off as you do it. This system will keep your genealogy records organized for your benefit and hand them on to your posterity.
It is highly flexible—the more ancestors you find, the more expandable and flexible the system becomes. It can be multi-generational and strictly linear at the same time. The system is simple to set up, maintain, well organized, and inexpensive. It is easy to understand for the researcher and the mildly interested relatives alike, and I can find anything in just a few seconds.
I have used the concepts to organize my paper, computer, and oral and personal history files. I want to share the step-by-step instructions for helping you become organized using the color-coded filing system for ancestry research.
Introduction to Color-Coded Filing System
Starting organized is more accessible than getting organized later on. It didn’t take long before my research became weighed down with pedigree charts, family group records, to-do lists, research logs, documents, notes, and research tools. I was robbing myself of the precious research time because I spent hours looking for what I knew and duplicating research I had already done. When I became organized, I was able to
- Know exactly what information I had for each ancestor,
- Have a complete list of information I was missing for each ancestor,
- Know exactly what resources I had checked and the results of my research,
- Know every Book I had ever searched,
- Remember who I had contacted and the response I had received, and
- Easily file new research findings.
Choose an organization system that genealogists use. Several popular organization systems exist for genealogy. Research these systems and use the one that fits your style and that you will use.
My recommendation. I have evaluated, started, and subsequently abandoned several filing systems. I took a Mary E. V. Hill class on a filing system, and I reorganized my genealogy, history, and storytelling research using her color-coded filing system. It is highly flexible—the more ancestors you find, the more expandable and flexible the system becomes. It can be multi-generational and strictly linear at the same time. The system is simple to set up, maintain, well organized, and inexpensive. It is easy to understand for the researcher and the mildly interested relatives, and I can find anything in just a few seconds.
I have used the concepts to organize my paper, computer, and oral and personal history files. I would like to share the step-by-step instructions for helping you become organized using the color-coded filing system.
Getting Started with Color-Coded Filing System
The following four steps will help you organize your family records and documents.
Step 1. Gather items that have historical and genealogical information
Place a box in the middle of the floor, or somewhere that will catch your attention. Start gathering together items you already have that give genealogical information—documents, newspaper clippings, pictures, letters, etc. This is not the time to decide what does or does not have value to you as a genealogist. Whatever you find around the house, place it in the box.
Step 2. Fill in a pedigree chart
Write down your name and the names of your parents and grandparents. Include birth, marriage, and death dates and places if you know them. Take special note of the four surnames that you listed on the pedigree from both sets of your grandparents. You will use these surnames in Step 3. For example, the names of my parents and grandparents are:
Father: Alex Smith
Father’s parents: John B. Smith and Mary Brown
Mother: Anna Hall
Mother’s parents: Richard Hall and Elizabeth Ann Roberts
I used the surnames Smith, Brown, Hall, and Roberts in step 3.
Step 3. Separate the items found in Step 1 into boxes labeled with those four surnames
It’s now time to temporarily divide the items you found in Step 1 into four separate boxes, each labeled with one of your grandparents’ surnames (last names). I like to use containers that are the size of apple boxes. Sort what you have gathered, putting items belonging to the family or ancestors of one of the surnames into the container labeled with that surname.
Step 4. Create and expand pedigree charts and family group records
Look at the items in each container and see if you have information about your ancestors’ births, marriages, and deaths. Add new names, dates, and places to your pedigree chart using the information you find. Make family group records for each family on your pedigree chart. If you use a computer genealogy program, such as RootsMagic, or Legacy, enter your family information into the program. Don’t worry if you can’t fill in all the names and dates. Just start with what you know.
Setting up Color-Coded Filing System
There are thirteen steps for setting up the color-coded filing system. The system is time-tested and proven to be the organizational resource that will grow as you expand your research.
This system sets up file folders for the families on your pedigree lines and shows you how to file information about cousins and other relatives. Pedigree charts and corresponding family group folders are divided into four colors based on the lines of your four grandparents. Dividing your pedigree by color helps clarify which line a family belongs to. A family file folder holds documents and a copy of that family’s group record for each family on your pedigree. Don’t think you have to do all the steps outlined in one day. Pace yourself. Check each step off as you do it. This system will keep your genealogy records organized for your benefit and hand them on to your posterity.
Step 1: Gather Supplies for Your Filing System

This system works best if you gather together the following basic supplies:
- Two file boxes with lids. The boxes need to be strong, preferably made of plastic, and with inner ridges or grooves for hanging letter-size hanging files.
- Hanging files, colored. Letter-size hanging files in blue, green, red, and yellow. They come with 1/3 and 1/5 cut slots, which has to do with the size of the plastic tab. Choose the 1/5 cut which works best with this system. Hanging files keep the manila folders from slipping down in the file box.
- Hanging files, standard green. Letter-size hanging files in generic standard green color, 1/5 cut.
- Manila folders. 1/3 cut tabs assorted, with reinforced tops to last through heavy use. Start with fifty folders.
- Pens. Pen with an ultra-fine point felt tip and permanent black ink.
- Highlighters. Highlighters are colored light blue, light green, yellow, and pink (don’t use red because it is too dark). Colored pencils also work.
- Labels for file folders. Labels with blue, green, red, and yellow strips along the top and permanent adhesive on the back.
- Dots. Dots are colored blue, green, red, and yellow. These are not usually available with permanent adhesive, but the non-permanent adhesive will work fine.
- Prong bases, clips, punch. If you want to clip papers into manila folders, these tools are helpful, and the two-hole punch is the one you need.
- Acid-free paper. The acid-free paper extends the life of your notes. Good quality photocopy paper is almost always acid-free but check the packaging.
- Other file boxes. For expanding your files, as needed.
- Carrying case. Letter-size carrying case with a handle to take with you when researching.
Tip: What type of highlighters should I use? I would recommend that you find the type of markers you use to highlight in a book because they won’t absorb through your paper and make a mess.
Tip: Why am I buying boxes when I have a filing cabinet? You can use a filing cabinet, but I have found it very convenient to use boxes. I can pick up the box and take it over to my computer or put it on the dining room table while working on my research and staying organized.
Step 2: Put Pedigree Charts of Your Lineage at the Front of Your File Box
Label the tab of a standard green hanging file “Pedigree Charts.” Put a copy or printout of your pedigree charts, starting with yourself, in the file. Hang the file in the front of the file box. This set of your pedigree charts will act as a map for your family files. PAF Companion and Legacy will print pedigree charts in the four colors—blue, green, red, and yellow. Add more charts as you find the information.
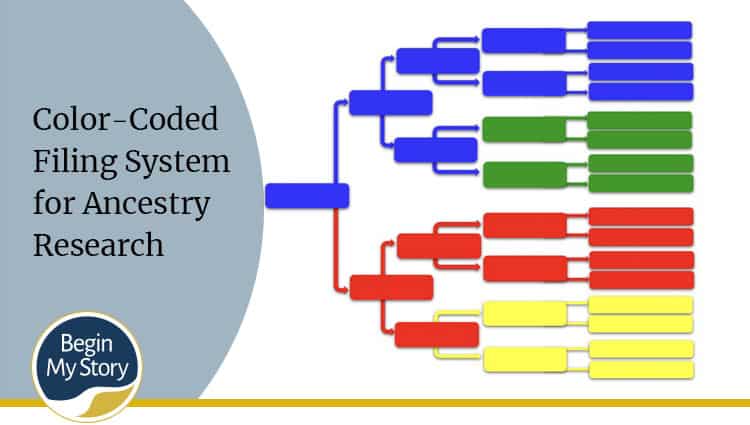
Step 3: Study the Circled Five-Generation Pedigree Chart
Study the Circled Five-Generation Pedigree Chart. It is a crucial key to understanding how the color-coding of family files works in the filing system using the five-generation pedigree chart. Each circle on the chart represents a family, and each circle has a color. In the following steps, you will learn to use those colors to set up your filing system.
See Figure 1 and Figure 2 for an example of five generations converted to a color-coded system.
Color-coded Filing System for Ancestry Research-Figure 1

Color-coded Filing System for Ancestry Research-Figure 2

Tip: Do I need to use a five-generation chart? Experience has shown that this system is set up most efficiently based on a five-generation chart, and the four-generation chart does not work and confuses people. As your research progresses, you will be able to expand this system and go way beyond the five-generation chart.
Tip: Can I use the same five-generation chart for myself and my spouse’s line? When I set up my system, I used a five-generation pedigree chart for my direct ancestors and a separate one for my wife and her ancestors. You can start with one of your children as #1 on the chart. However, you only have two colors for the husband’s lines and two for the wife’s lines. I prefer the advantage of having the four colors for my own four grandparents.
Tip: Who should be in the #1 position on the pedigree chart? The real purpose of the filing system is to help you do genealogy research, and if you are going to concentrate on doing your lines, you probably want to start with yourself as #1. It will make using the color-coded filing system easy to follow when sorting the blue, green, red, and yellow sections for your four grandparents. Because I was working with two pedigree charts, I put myself as #1 for my family line, and my wife was #1 for her family line.
Step 4: Separate the Lines of Your Four Grandparents by Color

Print a copy of your five-generation pedigree chart from genealogy software, or print it out and then manually fill in a blank form, starting with yourself as to #1. You are the first generation; your sixteen great-great-grandparents are the fifth generation. Using the Example of Five Generations Converted to a Color-coded Filing System (See examples under step 3) as a guide, draw colored circles around each family on your five-generation pedigree chart. Color-code the lines as follows:
- Blue: Circle all families who are ancestors of your father’s father in blue.
- Green: Circle all families who are ancestors of your father’s mother in green.
- Red: Circle all families who are ancestors of your mother’s father in red.
- Yellow: Circle all families who are ancestors of your mother’s mother in yellow.
Allow me to explain how to relate the chart to your own pedigree chart in further detail. I have created the following exercise to walk you through mapping your pedigree chart into blue, green, red, and yellow. Look at your pedigree chart. Notice the numbers that are associated with different names. You are #1, your father is #2, and your mother is number #3. I will refer to these numbers throughout the exercise.
- 1. Start with the blue highlighter. Place a blue line under your name (#1), your father’s name (#2), and your grandfather’s name (#4). Put the blue highlighter away and open the green.
- 2. Highlight your father’s mother (#5) with green. Now pick up the blue and put a circle around the number 4/5 family (your father’s parents). Are you beginning to see how this works? The grandmother introduces the green family line, but it is a blue family. Why is it blue? In this filing system, we file information under the father’s name. It is blue because the father in this situation is highlighted blue.
- 3. Let’s now use the pink highlighter for red (if you use a red highlighter, it will block out the name. Draw a pink line under your mother’s name (#3) and your mother’s father’s (#6).
- 4. Now we are ready for the yellow highlighter. Underline your mother’s mother (#7) with the yellow marker. She introduces the yellow line.
- 5. Retake your pink highlighter and draw a circle around the number 6/7 family (your mother’s parents). This family unit will be red because the father is red.
- 6. Pick up the blue highlighter again and draw a circle around your family unit (such as yourself #1, father #2, and mother #3). With the blue still in your hand, circle the family units of numbers 8/9, 16/17, and 18/19. Your father and all his ancestors will be blue as far back as you discover them.
- 7. Take the green highlighter and circle the family units of 10/11, 20/21, and 22/23. Your father’s mother and all her ancestors will be green.
- 8. Use the pink highlighter to circle the family units of 12/13, 24/25, and 26/27. Your mother’s father and all his ancestors will be red.
You have now filled out your five-generation pedigree chart and circled each family. In the steps that follow, you will see just how vital the chart is, and it is the map to the rest of your historical and genealogy research. I recommend purchasing a sheet protector and putting your circled five-generation chart back into the sample chart.

When I finished this exercise for the first time, I understood the logic of the color system—me as the child with blue for my father and his parents; green for my father’s mother and her parents; red for my mother and her parents; yellow for my mother’s mother and her parents. As I get information, I have colors in my mind attached to the names of the people that I am working with, and with those colors, I can quickly remember where to put it and where to find it, and it gives me a sense of direction that I didn’t have before.
Tip: What if I can’t do everything exactly as explained? I’ve found that it’s essential not to get too bogged down by the details. If you run into a snag and you can’t do it precisely the way the instructions say, do the best you can with what you have. Feel free to experiment. Try it and see if it works. Nothing that you do is going to be set in stone. You can redo it if you need to, and if you find something works, great; if you find that it doesn’t, you can go back and make changes.
Step 5: Put Sixteen Hanging Files into Your Box

Place four blue, four green, four red, and four yellow hanging files in your box.
Step 6: Label the Colored Hanging Files with Your Family Surnames

Label each colored hanging file with the surname of one of your sixteen great-great-grandparents. There will be four surnames in each color. Use the sixteen surnames that go down the right side of your five-generation pedigree chart to know which surnames to put within each color.
Place all the tabs on the left side of the colored hanging files
Write one surname on each hanging file tab (plastic tabs come with the colored hanging files). Use a permanent, black-ink, ultra- fine-point pen for writing names. Rather than write the names by hand, I printed labels from my computer with color-coded labels.
Hang the files in alphabetical order within a color. Put the blues alphabetically in one group, the greens in another, the reds in a third, and the yellows in a fourth group. You can separate one color group into a new box if the original box gets too complete with all your documents and research.

It’s okay if you don’t know the last name of some of your sixteen great-great-grandparents. Label as many files as you can and leave the other blank-tabbed files in the box for future use.
Tip: Where are my great-great-grandparents located on the five-generation chart? Your great-great-grandparents are the people who are listed with the numbers 16 to 31 on your five-generation pedigree chart. For example, the surnames for my blue files will come from lines 16, 17, 18, and 19 (for this example, those names are Smith, Murray, Davies, and Rodgers). The surnames for the green files will come from lines 20, 21, 22, and 23 (Brown, Allred, Evans, Young). The surnames for the red files will come from lines 24, 25, 26, and 27 (Hall, Mitchell, Larsen, Bell). The surnames for yellow files will come from lines 28, 29, 30, and 31(Roberts, Baker, Ward, Allen).
Tip: Why are the tabs placed on the left side? Putting surnames on the left-hand side developed over time by people using the system. The files on the left are the surname hanging files for the pedigree charts. It’s the front piece of the surnames behind that particular folder. So if it’s the Smith folder, it’s going to have Smith pedigree charts in the font folder, and it’s going to have Smith families behind it. It makes it very easy to locate these files quickly. In the steps that follow, you will learn about the positioning of the other files.
Tip: What surname do you use on the label if you find it spelled multiple ways? In one of my family lines, I have the German name Diehl. I have five different ways that names can be spelled, and I have tried writing all of those variations on my tab—Diehl/Deal/Dill/ Deel/Dehl. That was a hassle, so I chose to use the most common spelling used in the United States—Diehl. I then placed a note in the file explaining my decision and a list of the various spellings.
Step 7: Put a Highlighted Copy of Your Five-generation Pedigree Chart in Each of the Colored Folders

Print sixteen more copies of your five-generation pedigree chart, with you as #1 on the chart. On one of the pedigree charts, highlight the names of all persons with the same surname, using the color assigned to that surname. File the highlighted pedigree chart in its surname hanging file.
Repeat highlighting a surname line and filing the pedigree chart in its surname hanging file for each of the sixteen surnames. These charts will be used as guides or maps for each surname folder. Highlighting the surname on the pedigree chart makes it quick and easy to see how that surname fits into your complete family pedigree.
Tip: What if your research goes one or more generations beyond the five generations? You may want to print all the pedigree charts for one surname, starting from the first person with that surname on your five-generation pedigree chart. Staple together and file these pedigree charts in the front hanging file of that surname and the highlighted five-generation pedigree chart.
Tip: What if I have two persons with the same grandparent on my pedigree lines? (This situation happens when cousins marry.) If two persons on your pedigree lines prove to have the same grandparent, put a note in one of their files saying that that particular line will be continued in the other person’s file. Name the other person so the charts are easy to find. From then on, just follow the one pedigree line because they will be identical.
Step 8: Set Up A Manila File Folder for Each Family on Your five-generation Pedigree Chart
This is an inspiring moment in the creation of your filing system. You will now identify and pick out each family as a unit. Each family gets its manila folder in which you can begin to organize your research. Start by printing or writing a family group record for each of the families on your five-generation pedigree chart.
If you can identify all of these families, including the parents of your great-great-grandmothers, you will be setting up a total of twenty-three manila family folders. These third great-grandparents will not be on the five-generation pedigree chart, and you will have to go to the following chart to find their names.
Once the system is set up, you can add additional family folders as you find more information.
Using your five-generation pedigree chart as a guide, decide what color each family should be filed under. Mark the color on the top of the family group record or print with PAF, Roots- Magic, or Legacy. Set up manila folders for each family by putting a colored label on the file folder tab. Match the label color to the color of each family group record. Be sure to use labels with permanent adhesive. The manila folders of parents should all be right-tabbed. Fold left-tabbed manila folders inside-out to make them right-tabbed, as needed.
Colored strip

On the label, write the following information, as shown below:
- The surnames of the husband and wife are followed by their first names.
- A small “b.” (for “birth”) and the year of their birth.
If one of them were married more than once, a label which marriage this is—for example, “m2” would denote this as the second marriage.

The label only gives enough information to identify this family, and other information can be found on their family group record in the file folder.
Tip: Why do I want to set up family file folders for the parents of my great-great-grandmothers now? If you are going to have a family file folder for each of the sixteen surnames in the fifth generation on your five-generation pedigree chart, you are going to have to find the names of the parents of your great-great-grandmothers. Then set up file folders for these eight families. Your eight great-great-grandmothers will appear as daughters in these families. If you want to, you can do the same for your eight great-great-grandfathers now. If you also do the parents of your eight great-great-grandfathers, you will have thirty-one family file folders in your system.
Tip: Where do I find the information to make family file folders for the parents of my great-great-grandmothers? To find the parents of your great-great-grandmothers (numbers 17, 19, 21, 23, 25, 27, 29 and 31 on your pedigree chart), go to the pedigree charts you printed and filed in the standard green hanging file at the front of your box. If you have the information about the sixth generation in your database program already, find the pedigree chart that shows the sixth generation of a great-great-grandmother. That pedigree chart will give you the names of the parents of that great-great-grandmother.
Step 9: File the Manila Family Folders
Put a new colored hanging folder behind each surname hanging file, matching the color of that surname. Place the manila family folders in these newly added hanging folders. Group the manila family folders by color and then by surname—all the “red” Smiths together, all the “yellow” Roberts families together, etc. You can now arrange the family folders alphabetically by the husband’s first name or by the generation.
Tip: How do you manage patronymics? It can be a challenge for those of you who have Scandinavian, Asian, Polynesian, or American Indian ancestry—any situation where the surname changes every generation. In this situation, I prefer to file family members by location. In other words, these people tended to live for generations in the same parish and on the same farm, and I have found it easiest to keep them by generation going back, by location. Another option you may consider is to file each of the families by the name they’re known by in alphabetical order and then by date. I encourage you to look at the various options in patronymic filing and realize that it is possible to keep track of these people either by location or alphabetically and by date. See my website for more details about patronymics.
Five-Generation Family Folders

Tip: How do you organize the files by generation? I chose to organize my family files by generation. Folder 1 would be the first generation; the second folder would be the second generation. I will align the family folder labels on the right side of the container.
Step 10: Start Filling Your Family Folders

Include the following things in a family folder:
- The family group record of the family. If there was more than one marriage, make a separate folder with a family group record for each marriage. Do the non-direct line marriages in center-tab folders.
- Documents you have already gathered that belong to this family
Add the following items to a family folder as you need them:
- To-do list of questions about this family that you want to find answers for.
- Research log for keeping a record of sources you look at about this family.
- Timeline for a chronology of this family’s life events.
- Maps about where this family lived.
- Research notes.
- New documents you find.
Include all documents from the time of a couple’s marriage. Documents that pertain to events before their marriage can be filed in the folders of their parents, such as birth certificates and baptism certificates.
These are all valuable tools, and as you add these tools to each of the manila folders, you’ll find that you’ll be able to move forward systematically—identify this family, document this family, and have the feeling that you are creating a good, robust, and accurate genealogy. I encourage you to understand what to do with the to-do list, how to use a research log, how to keep track of where you’ve been researching, and how to use a timeline to be sure that you’re not combining generations when they should be, for example, a junior and a senior.


Tip: Is there a way that I can include folders about the individual children of a family unit? Using center-tab manila folders, create a file for each child as the parent of a family. Include their spouse and their children. File these center-tab manila folders behind the direct line parent’s folder.
- Use center-tabbed manila folders for the children. This includes collateral line (aunts and uncles) families.
- File the children’s folders right behind their parents’, in the related children’s birth date order (not the spouse’s birth date).
- Put a colored star on the upper right corner of your direct ancestor. The star’s color should be the same as the parent’s line.
- Put a colored dot in the upper right-hand corner of the family group records of non-direct line children to quickly see they are non-direct line. The dot color should be the same as the color of the parent’s line.
When I am filing papers about a direct descendant (folders with the star), I place all the information about a person in the years before marriage (birth certificate, baptismal record, and so on) in the “child” folder behind the parent. I place all information associated with the direct descendent following their marriage in their family folder (marriage certificate, death certificate).
When I am filing papers associated with siblings of my direct ancestor (aunts and uncles) and their families, I will place any information (birth certificate, marriage certificate, or death certificate) in the child’s folder.
When I create children’s folders, I will include the child’s spouse on the label. This is a personal preference, so do what works best for your filing.
Step 11: Set Up Other Valuable Files

The files that we will talk about in this step are as crucial as any of the previous files we have previously set up. It would be nice if we could always get our genealogy to fit into surname files that we have set up, but that is not a reality. The Holding, Locality, and Help files are used when you find helpful information for researching more than one family group, such as a group of cemetery records for that surname in the same locality where your ancestor lived.
- Holding Files. Set up surname Holding Files to store items with information about that surname that includes more than one surname family.
Place the Holding File right behind the surname hanging file with the pedigree charts and before the family files. Do this for any surname where you see the need.
When you have many documents for a surname, it helps to create two Holding Files for that surname. Set up one folder as a temporary storage file and the other to permanently store documents with many family information. An example might be the parish registers of a church where your ancestors of that surname lived for two hundred years. Be sure to go back and use the documents stored in the Holding Files!
Tip: How do I store photographs in folders? Photographs should be stored in archival quality holders in three-ring binders for long-term preservation.
Tip: How do you use the holding files? The most valuable part of this system for me when I first started was the holding files because I took my piles of information and broke it down into big groups of surnames, and then they became very manageable. I could then refine and organize as I had time. There are two kinds of holding files that I find helpful. For example, I have a temporary holding place for the Smith family. There are times when I come home from research, and for one reason or another, I don’t have time to sort my research, and I just put them in a temporary holding file right behind the Smith surname. I will sort the documents into the appropriate family and individual folders when I have the time. When I have documents that pertain to several Smioth families (such as they were all going to the same church, buried in the same cemetery, or went to the same school), I will put this document into a permanent Smith holding a file that will go right behind the Smith pedigree chart file.
- Locality Files. Set up Locality Files for locations you are researching. Documents often contain information about more than one family from the same place. Records such as a census index of your family surnames, a map, a list of marriages from a town or county, an index to the wills in an area, or a local history can be stored in a file named for that locality. Information from these documents should be added to your computer databases—such as RootsMagic, or Legacy—with a source reference and notes taken from the documents filed in your Locality File. Add Locality Files as you need them. As you find the need, set up Locality Files for countries, states or provinces, counties, cities, parishes, or towns.
- Use standard green hanging files for Locality Files.
- Put these hanging files in the second file box you purchased.
The following are several scenarios of the organizational structure of a locality box for different countries showing the sequence in which the files and folders will appear:
| Brazil | Canada | France | Germany | United States |
| State | Province | Old province or new department | Province | State |
| City or Town | County, when one exists | City or town | District (Kreis) | County |
| City or town | City or town | City or town |
What do you put in each folder? Available records vary depending on the location. In a state, province, or department file folder, put the following kinds of items:
- Guide to the state, province, or department archives.
- A will index for the whole state, province, or department for the surnames you are interested in.
- Census index for the state, province, or department for the surnames you are interested in.
- History of the state, province, or department.
- County boundary changes for the whole state, province, or department.
In a county file folder, put the following kinds of items:
- Printouts from the Family History Library Catalog.
- Index to the county court records for surnames you are interested in.
- Index to county land records: grantor and grantee indexes for surnames you are interested in.
- Pages from a book of marriages in the county for the surnames you are interested in.
- Tax lists for specific years in the county.
In a city or town file folder, put the following kinds of items:
- Cemetery records.
- School census.
- City map.
- Map of ward or parish boundaries within the city.
- Church records from churches in the city or town.
Tip: Can you provide an example for setting up locality files? Anyone who makes family history gets into places reasonably heavily, so you get records about many people, not just your direct line. You need to create files that deal with county records, census records, and different things about the place. When I started using locality files, I was researching ancestors from the state of Kansas. I set up a separate container with the label “Kansas.” The first folder in the container was set up for maps (road maps, period maps). The second folder was labeled “Kansas” and included genealogical and historical publications from Kansas. Following the Kansas folder, I set up a series of folders with the names of the counties I was researching. These folders are alphabetically organized. I then can add folders as I need them behind each county. For example, when I was researching the city of Otis, Kansas (in Rush County), I secured cemetery records from a Methodist and a Lutheran cemetery. Behind the Rush County file, I added a file for each cemetery and dropped the records associated with each cemetery into each folder.
Tip: When do I create a holding file rather than a locality file? Someday you’re going to run across a list of cemetery records, and you’re going to look at it and say, “There were six of my families with six different surnames in this cemetery. Which one of my family folders will I put this cemetery record in?” And then you will ask, “Do I need a holding file or a locality file?” A locality file works if that cemetery is in a specific county (such as Rush County), and all six of those families were in Rush County. That’s a locality file. A holding file is created if you have lots of information about one surname (such as the Wagner family), but you have the Wagner family getting land in ten different places. You can’t simply put that one list of deeds in one Wagner family because it belongs with lots of Wagner families, and so you put it in a holding file.
- Help Files. Set up Help Files, as needed, for tools such as language aids, religious information, or handwriting guides. Group Helps Files together in the front of the Locality box.
Step 12: Expand to Other Boxes As Needed

When one of your color sections gets too big for your box, move all files of that color into another box. As you find more information, you will eventually have boxes for each color—sometimes with several boxes for a color!
Tip: Do binders have a place in the color-coded filing system? Three-ring binders have a place, and I will share several experiences with you.
- There were times when I was researching a complicated “brick wall” type problem. I included a to-do list, maps, pedigree chart, family group records with research logs for the various families, copies of documents, etc. Once I resolved the problem, I wrote a case summary explaining my research and findings and put it in the binder. Then I stored the binder on its side in the box next to the family folder and continued to use the family folders for research. Label the binder with the name of the person you researched in that binder, such as “Smith, John.” Why did I keep the research in the binder? Because I wanted the research, documentation, and analysis to stay together to review as needed and for future researchers.
- There are times when I have very precious, one-of-a-kind artifacts that I do not want to go into the filing system. I will use archival supplies and a binder to help preserve the artifacts.
- Once, we took a month-long research trip back to Virginia, Tennessee, Pennsylvania, North Carolina, and Washington, DC. I created binders with the information I needed for each of the counties I would visit. The binder kept the research organized and together. Using folders in this research experience tends to get messy and shuffled. I had a binder for each person on the trip, and I transferred the information back into the appropriate folders when I came home.
There is a purpose for binders, but I am convinced that you will do better with manila folders for your overall filing system.
Tip: Do you ever use any other colors besides blue, green, red, and yellow? Yes. Remember that the system is very flexible to expand to your research needs. When I began research on the ancestral lines of my step-parents, I chose to use the color purple to separate my research, and I set the files up precisely as I had done for my ancestors in a separate box.
Tip: What are your thoughts about including (living) descendants’ files? The system is very flexible to help you keep track of family in both directions, so feel free to include living descendants’ files in your system. I use the system to record and organize information about my wife and me, our children, and our grandchildren. I set up the family file for my wife and me. I then created a folder for each of our children and their spouses and placed them in the order of their birth. As grandchildren are born to each family, we add a folder and place it behind their parents’ folder. It makes it very easy for me to keep track of the precious documents and memories we share with our family. I created these files and folders in blue, but it would be straightforward to create a descendant’s box with another color, such as orange.
Step 13: How Do I keep the Basic File Folder System Updated and Valuable?
Once you get your basic file folder system set up, it is essential to realize that it will continue to mature as you continue your research. The following are suggestions on how to do so:
Set up a simple “inbox.”
- Any basket you have will do. Place new documents, emails, correspondence, and so on into the inbox until you have time to file the items in Holding Files, Family Folders, or Locality Files.
- Take time regularly to decide where each item needs to be filed. Write the name of the family or locality the document pertains to in the upper right-hand corner of the document—” Smith, John” or “Cumberland, New Jersey.” Set aside time to file it in the appropriate box.
Work on researching one family line at a time.
- Pick one family line. Make a to-do list of questions you want to find answers to. Do the research needed to answer the questions on your to-do list.
- Record the records you search on research logs and whether the record had information.
- Label the documents you find with the name (such as Smith John) or locality and file the documents.
- Enter the information you found into computer programs such as RootsMagic, or Legacy. Enter documentation into the “sources” field and make explanations in the “notes” field.
How to Add New Surnames
It is simple to add new families to your filing system as you find new information.
Let’s say you have a line where you know that Jeremiah Perry, b. 1748, Cumberland County, New Jersey, has a wife, Sarah. You know nothing more about her, so you have her entered as Mrs. Sarah Perry.
One day while searching on the Internet, you find a reference to Sarah Harris, who was married first to a John Miller in about 1767 in Cumberland County, New Jersey. They had one child, and then John Miller died. Sarah Harris was then married to Jeremiah Perry in 1769 and had a son, Jeremiah Perry, b. 1770. That matches the family bible records you have ideally!
The website gives you three generations of Sarah Harris’s ancestors with good documentation. After verifying the information, you want to add these new families to your filing system. Jeremiah Perry and Sarah Harris are in your yellow line.
To add this information to the file, simply follow these steps:
- Make new yellow hanging surname folders for Harris, Crosley, James, Hand, and Johnson—the five new surnames you have now identified. Add highlighted pedigree charts to the folders to see how these people are related to you.
- Make family groups for Sarah Harris as a child with her father, Jacob Harris, and her mother, Rachel Crosley.
Using the Color-coded Filing System for Patronymics
The same basic filing system can also be used for families that did not have fixed surnames, but it requires additional considerations. The example described here is from Scandinavian countries where, before 1860-1900, a child took his father’s given name and the suffix -sen/-son or -datter/-dotter, depending on whether it was a boy or girl. Similar patronymic systems were used in the Netherlands, Slavic countries, and northern Germany, and they can be handled differently. Patronymic systems used in Latin American countries may require a different organization.
Instead of using a surname to organize your family files, you will need to use the name of the farm or village where the family lived for countries with patronymics. As Scandinavian and European societies were based on a feudal system and most people were farmers, the place where the family was living became very critical in identifying and distinguishing the family from others with the same names. Every farm had a name in Norway and parts of Sweden and Finland, and larger farming districts also had names. Not every farm in Denmark and some parts of Sweden had a name, but the village or farming community would have had a name.
As property generally stays in the same family from one generation to another, you can use the place name and family name as identifiers rather than the surname.
Color Coding
The color-coding system is used to distinguish different branches of your family. Just as you can distinguish your four grandparents’ lineages using four colors, you can also identify your Scandinavian lineages with a different color. If you have two Danish ancestors and one Swedish ancestor who all came to America from different parts of Denmark and Sweden, you should use a separate color for each line, and this will help keep the three lines distinct and keep you from getting them confused. Mark each file according to the color of the emigrant ancestor to whose lineage it belongs.
The filing system for these patronymic families will have a file with pedigree charts at the front showing the ancestry of the emigrant ancestor. It will then have general information and records about the county where the emigrant was from, the parish where the family was from, and the farm where the family was from. These general and locality-based files will have a tab in the center of the file, so they can easily be distinguished from the family files, which will have tab labels on the left or right side. The farm file might include copies of census records that list all those living on a farm or in a village for different census years. The county file might have extracts from records that include more information than just one farm.
Behind the file with information from the farm will be a file for each generation of the family, listed from the most recent generation back to the earliest generation. For example, if your first ancestor from Denmark was Iver Bendtsen, born in 1822, from the Skarup farm, his file will be listed first. The files for his father Bendt Knudsen (born 1802) and grandfather Knud Madsen (born 1769), who raised their families on the Skarup farm, will be listed next.
In some cases, the property may have been inherited from a mother’s line rather than from the father’s line, in which case the father would be from another farm. The mother’s line will then be followed under that farm, and the father’s lineage will be listed under the farm where his family was from. In this example, Knud Madsen’s wife, Kirsten Bendtsdatter, was born on the Skarup farm, so her father’s file (Bendt Nielsen, born 1725) will be listed next. Knud Madsen was born in the village of Hojmark in Lem Parish. After all the direct line ancestors from the Skarup farm have been filed, a place file with a center tab for Lem Parish and one for Hojmark village will be next. Then the file for Mads Andersen will be the following file.
The pedigree chart at the beginning file will be a key to the system, and pedigree charts showing the ancestors who extend back in each locality should be included in the locality files. You should have one copy of this pedigree chart with the farm where the family is filed listed next to the male ancestor’s name and highlighted, and this will make it easy to find a particular ancestor’s file.
Description of Folders
The left and right tabs can both be used for family files. The purpose is to distinguish the place files from the family files by having the place files in the middle. If you are researching families other than direct ancestors (collateral lines), you could put all the direct line ancestors in the left tab files and all non-direct lineages in the suitable tabbed files.
The information listed on the tab includes the name of the husband and wife on the left and the farm where the family lived and the husband’s year of birth. If you have not to color code the files, you might also include an abbreviation to indicate this is the ancestry of Iver Bendtsen. If a family lived on more than one farm during their married and later life, try to find the place where they lived for the most time or where most of the children were born and file the family under that farm. Color-code the files for the ancestors of Iver Bendtsen red.
This example is shown with the files (each square represents a file folder) at the front of the filing box at the bottom of the diagram.