Use this 7-step color-coded filing system for personal and family storytelling.
Every life is a story. When you are writing narratives about individuals and families, they can include stories about immigration or emigration, old neighborhoods, military service, marriages, births, deaths, famous or infamous family members, culture, religion, political endeavors, education, and social and economic status. The narratives provide valuable insight into the lives. In order to write a great narrative, you are going to need a file organizing system for careful collection, management, and retrieval of information to write the stories that are part of the narrative. I want to share with you the preparation process I go through with getting ready to begin the preparing for the process of writing a personal and family narrative. This article will address the following:
- Part I—Setup Color-Coded File Organizing System for Writing Narrative
- Part II—Gather, Interview, and Research
- Gathering and Cataloging Example
As a result of the color-coded file organizing system, I desire that you can quickly and more effectively research, catalog, and write the narratives you want to write without missing important details that can make your stories come alive.
Part I: Setup Color-Coded File Organizing System for Writing Narratives
In this phase, I will describe a paper-based color-coded file organizing system for writing personal, individual and or family narratives (histories). The file organizing system is a simple but effective way of filing and retrieving information when writing stories associated with the narrative. You will be able to file and retrieve any information in as little as 30 seconds or less.
As part of my paper-based system, I also have a supporting digital file organizing system for information digital artifacts and research.
You can use the same color-coded file organizing system to write a personal narrative, memoir, autobiography, family history and more. I will use as an example the color-coded file organizing system I set up for my writing my mother’s lifetime narrative. For ease of writing, I will refer to my mother as “Mary” throughout the article.
As I researched Mary’s life, the information did not linearly come to me. In one interview, I learned about a story when Mary was 18, and she worked at a cannery, in another interview, I learned about an experience she had with a friend when she was 46 on vacation to Bahama’s. That same person shared letters and cards that Mary had sent her friend over 20 years. I needed a place to organize this information. The color-coded file organizing system allowed me to put the information in a color-coded folder and forget about it until I was ready to write about the experience or period.
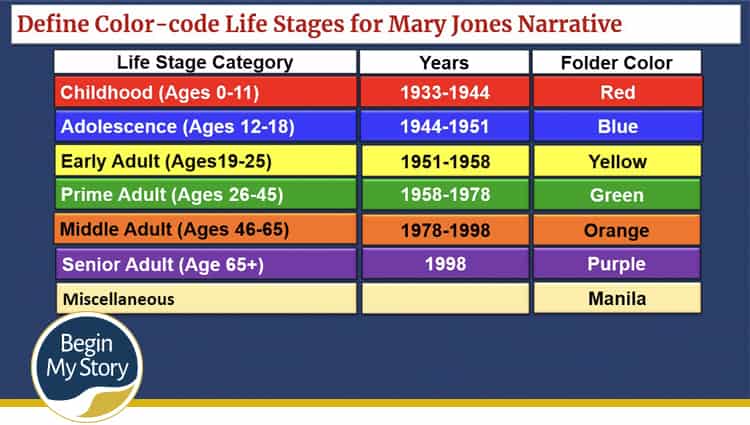
Step 1. Define and color-code the life stages
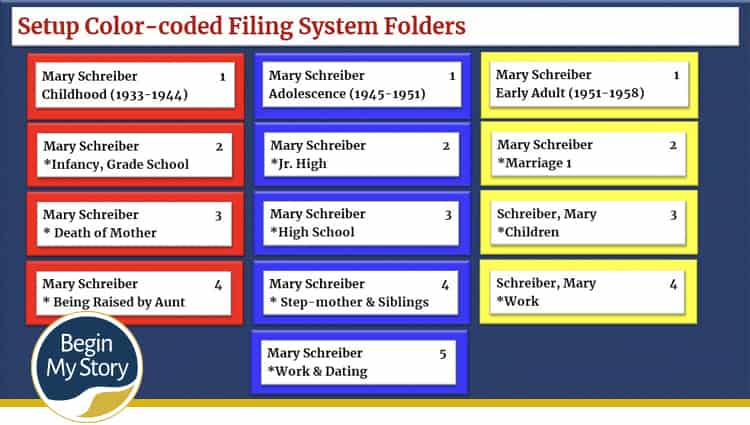
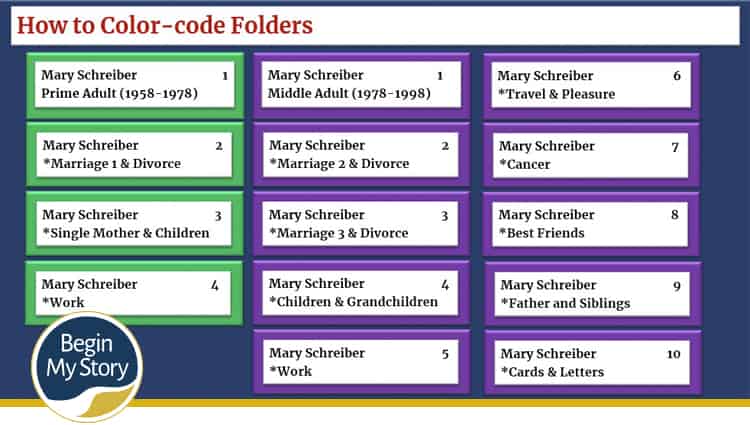
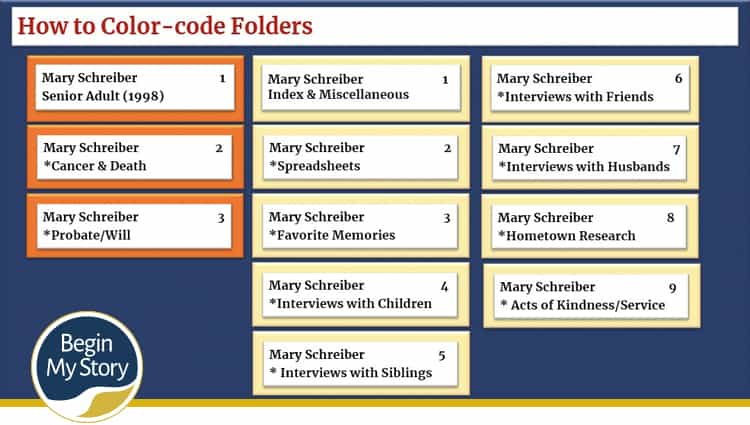
One of the most challenging parts of writing a narrative is keeping your research and information organized so you can quickly file and retrieve the data. To manage the research and information I gathered about Mary’s life, I decided to separate her life into six age-related periods. As part of the color-coded file organizing system, I assigned a different color for each life stage. See the above image.
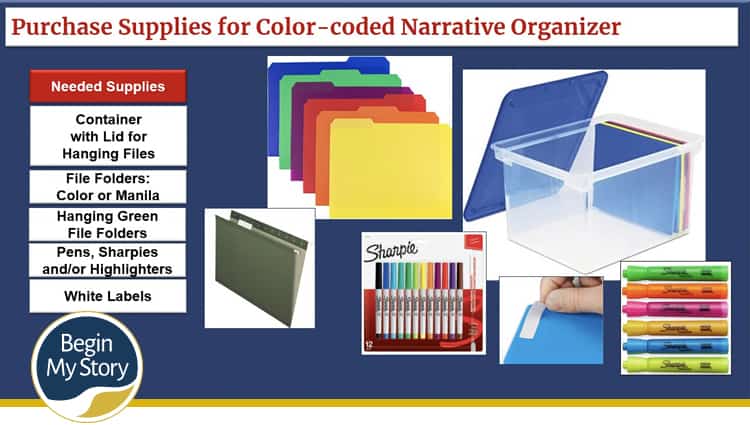
Step 2. Purchase/gather supplies
This system works best if you gather together the following basic supplies:
- One file box with a lid/cover. The box needs to be strong, preferably made of plastic, and with inner ridges or grooves for hanging letter-size hanging files. You can also use a cardboard box mand for files.
- Hanging files, standard green. Letter-size hanging files. They come with 1/3 and 1/5 cut slots, which has to do with the size of the plastic tab. Choose the 1/5 cut, which works best with this system. Hanging files keep the manila folders from slipping down in the file box.
- Color folders or manila folders. For your color-coding, you can either use color folders with white labels or use manila folders with color-coded labels. Try to get reinforced folders.
o Color folders. If you choose color folders, purchase a packet of red, blue, yellow, green, orange, purple and manila folders. You will use white labels with black ink on the folders. This is the path I choose.
o Manila folders. If you choose manila folders, you will white labels with color-coded pen/ Sharpie/highlighters. See the attached image for an explanation. Start with a packet of 50 manila folders. This is a less expensive way to go. I use the color pen/ Sharpie on the label for my color-coding.
- Pens, Sharpies, and highlighters. There are three ways I have used to color code the folders. See the image for an explanation.
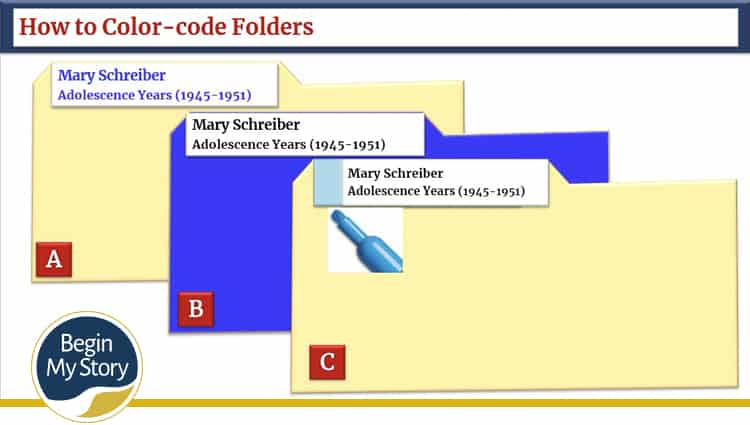
A. Manila folders with color Sharpie. If you are going to go with manila folders and Sharpie, I suggest that you go with ultra-fine Sharpie in colors of red, blue, brown (represents yellow), green, orange, purple, black. Write on the labels in the sharpie color.
B. Color folders, white-label, black ink. If you choose color folders, I suggest you use an ultra-fine black pen on the labels
C. Manila folders, black ink, highlighter. For this version, you write on the white label in black ink and then use the color highlighter on the label to denote color.
- White labels for file folders. Purchase white labels for your folders with permanent adhesive on the back.
Tip: What type of highlighters should I use? I would recommend that you find the markers you use to highlight in a book to note essential areas to remember because they won’t absorb through your paper and make a mess.
•Tip: Why am I buying boxes when I have a filing cabinet? You can use a filing cabinet if you want, but I have found it very convenient to use containers. I can pick up the box and take it over by my computer or put it on the dining room table when I’m working with my research and stay organized.
Step 3. Start a paper or digital spreadsheet
I will set up several spreadsheets to start my narrative project. They include a spreadsheet to keep track of:
- Files and folders.
- My to-do’s and mental notes
- My electronic files
Step 4. Setup color-coded file organizing system folders
Once materials have been assembled, you are ready to set up the files in a plastic or cardboard container. The purpose of the container is to provide one central location where you will file and protect your research and artifacts from writing the history.
I will first use my spreadsheet to outline the folders I know I will need for each life stage. I organized “Mary’s Box” as follows:
- Insert five hanging files, one of each chosen color for each life stage
- Print, write and color-code labels
- Attach the labels to folders
- Insert folders into hanging folders
- Add folders as needed or desired
By adding folders, I mean I will add different folders to various life stages for specific life events that I have learned about and will research and write about. In the following images you can see the first files and labels I added to the color-coded organizing system.
Throughout your research, you will collect and gather the information that needs to be organized, documented, and preserved for later retrieval. You should be able to find any piece of information or artifact in your file in thirty seconds or less.
When I first set up Mary’s color-coded files, I was already aware of areas of her life for which I would be researching and gathering artifacts. This is how I organized the folders.
Part II: Gather, Interview, and Research
Once you have the file set up, you are now ready to actively use the color-coded file organizing system for your research, interviewing, research organization and writing.
I want to share a critical rule of thumb as you enter this phase of your narrative writing project—Assume you know nothing about the topic, individual or family for whom you are researching and writing the narrative. You are the detective seeking to understand what you have and what your next steps will be. You are simply gathering information. This is not a time to edit and decide what is or is not essential. It is the first round; as you move beyond this stage and begin to interview others, you will uncover new artifacts, other individuals to interview, and places to visit. Start by doing the following:
Step 5: Develop spreadsheets
At this stage, I will be creating two spreadsheets that I will use throughout my research. They are a
The spreadsheets will become more and more important as you conduct your research because it tells where you’ve been and where you’re going and supplies the details for providing necessary citing and documentation when writing your history. I will place these spreadsheets in the Index/Miscellaneous section of the color-coded file organizing system. See Gathering and Cataloging Example below for more information on how I review and record my thoughts about artifacts.
Step 6: Review and catalog each artifact
Look for any clues and write them down. You can decide later whether to do further research. Conduct a “Good Glance.” Look at the artifacts close enough to know what you have. The following list is an example of what to look for in various types of artifacts:
- Photos: Inscriptions, people, signs, and dates
- Unpublished (cards, letters, and journals): To and from names, topics, and dates
- Memorabilia (brochures, tickets): Places, events, dates, and notes
- Newspaper Clippings: Names, associations, and dates
As you review each artifact, do the following.
- Write down any questions or thoughts that come into your mind as you review the material. I recommend this be in a spreadsheet format. You can organize it later.
- File the artifacts in the appropriate folder in the color-coded file organizing system.
- Make a list of family, friends, and acquaintances who you think knew the person. List the person’s name, address, telephone, and relationship to your person of interest. The list will come both from your knowledge and from clues you gain from reviewing the artifacts.
See Gathering and Cataloging Example below for details on how I review and record my thoughts about artifacts.
Step 7: Gathering Information and Materials
Start finding pertinent information and material to support your writing of the personal narrative by looking for and evaluating the following types of artifact:
- Diaries. A regularly kept diary is the most valuable source of personal history.
- Letters and emails. Letters go two ways—to and from individuals. Letters to you provide important information because the writer often responds to things you told them. As you interview family, friends, and acquaintances, ask to see if any correspondence has been kept that was sent to them from your person of interest.
- Documents and artifacts. Papers and objects that are important in our lives should be saved, such as birth certificates, marriage licenses or certificates, missionary certificates, awards, diplomas, drawings, paintings, poems, and talks. More bulky but still necessary are artifacts like sewn items, carvings, jewelry, and other handicrafts. Official government records are valuable, as are church records.
- Photographs. Beyond simply showing the faces of ancestors, pictures ought to capture typical work and play situations. Labeling dates and names on our photos is a must. The same goes for our digital files too.
- Tape and video recordings. Recording voices of children year by year is a great way to chronicle their lives. Dictated life stories preserve not only the story but the voice of the storyteller.
- Recollections of others. Written or tape-recorded, other people’s memories of your subject can provide a wealth of insight. People to contact for the person of interest can include parents, children, brothers and sisters, teachers or students, employers, employees, neighbors, close personal friends, local church leaders, visiting teaching partners, doctors, and former classmates or roommates.
- Life sketches and autobiographies. I have come across several life sketches and autobiographies about my ancestors that range from a few pages to ten pages. I find them to be very shallow, missing feelings and experiences. Whole chapters could be written on their stages of life and topics such as parenting, work experiences, religious work, family roots and background, influential people, life philosophy, and humorous episodes. These tiny life sketches provide a great starting point for further research and interviews to get a fuller, more complete picture of the person’s life.
- Your memories. Use photos, documents, and so forth to jar the memories of those you will be interviewing. If you are researching your history, look through the family photo album with a tape recorder in hand and record the thoughts and stories you think about who is in that fuzzy picture and why they’re essential. What do you remember about the place and time? Jar your memory with other things: visit your old school, listen to old records or tapes, see movies that were filmed about the years you grew up, or brainstorm with siblings or old friends.
Gathering and Cataloging Example
After Mary’s passing, I received some of her personal belongings. I remember finding photos, articles, brochures from a trip, past checks and receipts, and so forth in the bottoms of drawers, tops of closets, and every place imaginable. I put those items in a sack, brought them home, and forgot about them.
When I was ready to start my research, I rediscovered the sack I had put away and spread the contents out on the kitchen table. I made two spreadsheets to help me sort through the material. The spreadsheets helped me organize the early phases of my research.
I used the spreadsheets to build a mental picture of Mary’s
- Activities and experiences by periods
- Identify people who might have insights and artifacts relating to Mary’s life
- Identify topics and questions I wanted to discuss with different individuals
- Identify gaps for which I did not have information
- Identify areas where I could conduct background research to help tell the story.
Once I finished going through the sack, I reviewed other artifacts I had gathered, such as our family photo album, items in shoeboxes, and so on. The following are examples of the spreadsheet I set up.
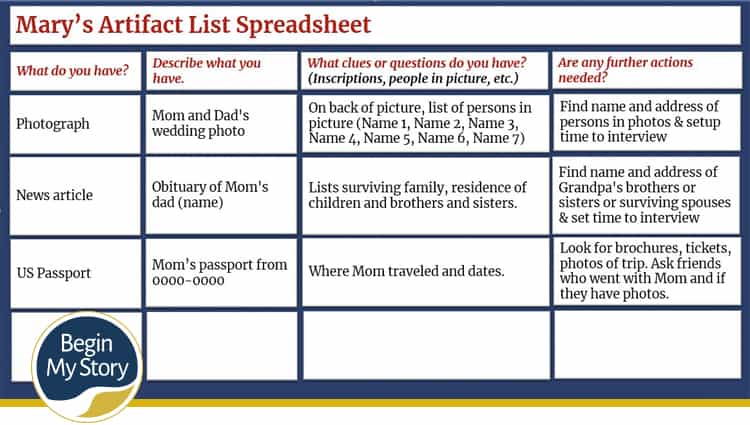
Mary’s Artifact List Spreadsheet for file organizing systems was an inventory of the artifacts that I had in my possession. In this spreadsheet, I created four columns. Each column heading was a question or statement. The questions are mental prompts of how I want to analyze the artifact and organize my thoughts. The column headings were:
- Column 1: What do you see? In this column, I record what I have such as photographs, news articles, birthday cards, U.S. Passport, in this column.
- Column 2: Describe what you have. In this column, I will write down a short description of what the artifact is about—for example, Mom and Dad’s wedding photo.
- Column 3: What clues or questions do you have? (Inscriptions, people in pictures, dates, names). This column is used to write down all of the clues and detail. For example, on the back of the photo of my mom and dad’s wedding, there was a list of all the seven brides that were in the picture next to my mom
- Column 4: Are there any further actions needed? In this column, you will record any thoughts/activities you would like to take. For example, for my mom and dad’s wedding photo, I wanted to find out the current married name of each of the brides’ maids, their address and telephone numbers for a possible chance to interview them later. I knew one of the brides’ maids. I showed her the photo, and she was able to provide me all the information. Once I learned their names, I entered their names and data into a second spreadsheet entitled “Mary’s Family, Friends and Acquaintances Spreadsheet” I was able to contact and interview each of them over the next six months.
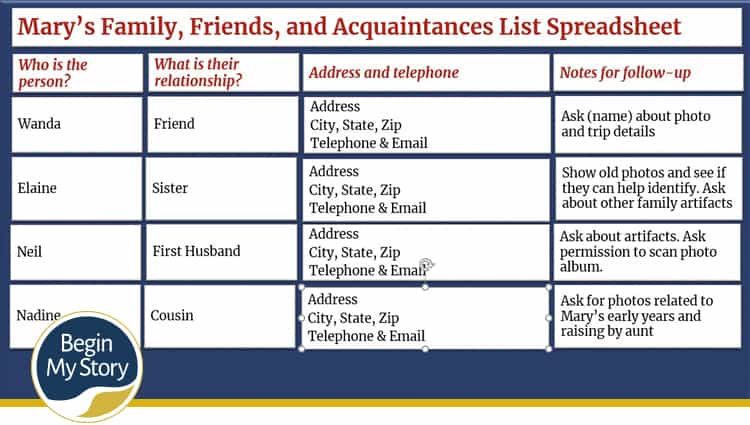
Mary’s Family, Friends and Acquaintances Spreadsheet for the file organizing system was a list of Mary’s circle of individuals that knew or had some knowledge of her. I used this list to keep track of all people I might want to interview or consult regarding information or artifacts related to Mary’s life. In this spreadsheet, I created four columns. Each column heading was a question or statement. The questions are mental prompts of how I want to analyze the artifact and organize my thoughts. The column headings were:
- Column1: Who is the person? In this column, I record the name of the individual.
- Column 2: What is the relationship? In this column, I will write down the connection. On Mary’s list, I included her siblings, children, friends from throughout her life, former husbands, cousins, aunts and uncles, co-workers, and others I was made aware of through studying artifacts, in interviews with other people on the list and more.
- Column 3: Address, Telephone, Email. This column is used to write down the contact information.
- Column 4: Notes for follow-up. In this column, I made notes and thoughts that came to mind. It is important to me to write down my thoughts as I have them about each person. It may be weeks, months or even years before I can connect with the person in an interview or visit their home. When I do, I have these notes to remind me of what I was thinking and want to do with this person. In this column, I recorded thoughts like
o What I wanted to ask the person about with I interviewed them
o What artifacts I wanted to ask them about
o Leads they had provided for people I should contact
o And so forth.
Related Content
- Complete Guide to Writing A Personal Narrative
- How to Use Sensory Details and Emotions in A Story
- 12 Easy Steps to Start Writing Your Memoir
- 9 Steps to Writing Your Personal Narrative
- Complete Guide for Conducting Oral History Interviews
- What You Can Learn from an Oral History Interview
- 5 Questions People Ask About Writing A Personal Narrative